Spring Boot로 어플리케이션을 개발하고 서비스를 할 때가 되면 해당 프로젝트를 배포하여 실행 가능한 파일로 만들어 주어야 한다. 본 글에서는 Spring Boot 어플리케이션을 JAR, WAR 파일로 배포하는 방법, 웹서버를 Tomcat, Jetty, Undertow를 사용하는 벙법에 대해서 설명한다.
전통적으로 웹서비스를 배포하기 위해서는 아래와 같은 방법으로 진행 하였었다.
- 프로젝트를 WAR 파일로 빌드
- Web 서버(Tomcat, Weblogic, Apache) 설치
- Web 서버에 WAR 파일 배포
하지만, Spring Boot를 사용할 경우 위의 과정은 아래와 같이 바뀐다.
- 프로젝트를 JAR 파일로 빌드
- JAR 파일 실행
Spring Boot는 배포하는 과정이 간단한데, 이는 빌드된 JAR 파일 안에 내장된 웹서버(기본은 톰캣)를 내포하고 있고, 실제 JAR 파일을 실행하면 내장된 웹서버가 동작한다.

Spring Boot로 프로젝트를 생성하면 spring-boot-starter-web 패키지 의존성이 있는데 해당 패키지는 spring-boot-starter-tomcat 패키지를 내포한다. spring-boot-start-tomcat은 임베디드 된 톰캣 서버를 의미하며 자바 기반의 웹 서버 역할을 충실히 수행한다.
JAR 파일 빌드
Spring Boot를 Maven 프로젝트로 생성하면 아래와 같은 pom.xml 파일이 생성된다. JAR 파일로 빌드하기 위해서 pom.xml 파일을 딱히 수정할 건 없다.
<?xml version="1.0" encoding="UTF-8"?>
<project xmlns="http://maven.apache.org/POM/4.0.0"
xmlns:xsi="http://www.w3.org/2001/XMLSchema-instance"
xsi:schemaLocation="http://maven.apache.org/POM/4.0.0 https://maven.apache.org/xsd/maven-4.0.0.xsd">
<modelVersion>4.0.0</modelVersion>
<parent>
<groupId>org.springframework.boot</groupId>
<artifactId>spring-boot-starter-parent</artifactId>
<version>2.3.1.RELEASE</version>
<relativePath/> <!-- lookup parent from repository -->
</parent>
<groupId>com.myself.test</groupId>
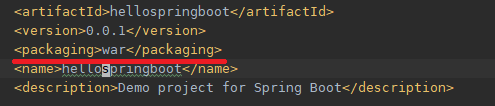
<artifactId>hellospringboot</artifactId>
<version>0.0.1</version>
<name>hellospringboot</name>
<description>Demo project for Spring Boot</description>
<properties>
<java.version>1.8</java.version>
</properties>
<dependencies>
<dependency>
<groupId>org.springframework.boot</groupId>
<artifactId>spring-boot-starter-data-rest</artifactId>
</dependency>
<dependency>
<groupId>org.springframework.boot</groupId>
<artifactId>spring-boot-starter-jersey</artifactId>
</dependency>
<dependency>
<groupId>org.springframework.boot</groupId>
<artifactId>spring-boot-starter-web</artifactId>
</dependency>
<dependency>
<groupId>org.springframework.boot</groupId>
<artifactId>spring-boot-starter-test</artifactId>
<scope>test</scope>
<exclusions>
<exclusion>
<groupId>org.junit.vintage</groupId>
<artifactId>junit-vintage-engine</artifactId>
</exclusion>
</exclusions>
</dependency>
</dependencies>
<build>
<plugins>
<plugin>
<groupId>org.springframework.boot</groupId>
<artifactId>spring-boot-maven-plugin</artifactId>
</plugin>
</plugins>
</build>
</project>
Maven 프로젝트를 JAR 파일로 빌드하고 실행하는 방법은 아래의 순서로 진행하면 된다.
mvn clean package
cd target
java -jar hellospringboot-0.0.1.jar
WAR 파일 빌드 방법
WAR 파일로 빌드하기 위해서는 두 가지만 수정하면 되는데, 첫 번째는 pom.xml 파일에 pacaking 정보를 생성해 주어야 한다.
두 번째는, 메인 클래스(여기서는 SpringSpringBoot)가 SpringBootServletInitializer를 상속받도록 하고, configure 함수를 오버 라이딩하는 것이다.

이제 mvn clean package로 빌드를 하면, target 폴더에 WAR 파일이 빌드된 것을 확인할 수 있다.
내장된(Embedded) 웹서버 변경 하기
JAR 파일로 빌드할 경우 기본 내장된 웹서버는 톰캣이고 Jetty나 Undertow로 변경 가능하다.
Jetty로 변경하기 위해서는 pom.xml 파일을 수정하면 된다. 우선 spring-boot-starter-web 디펜던시에서 tomcat을 제외하고 spring-boot-starter-jetty 종속성을 추가해준다.
    <dependency>
      <groupId>org.springframework.boot</groupId>
      <artifactId>spring-boot-starter-jersey</artifactId>
      <exclusions>
        <exclusion>
          <groupId>org.springframework.boot</groupId>
          <artifactId>spring-boot-starter-tomcat</artifactId>
        </exclusion>
      </exclusions>
    </dependency>
    <dependency>
      <groupId>org.springframework.boot</groupId>
      <artifactId>spring-boot-starter-web</artifactId>
      <exclusions>
        <exclusion>
          <groupId>org.springframework.boot</groupId>
          <artifactId>spring-boot-starter-tomcat</artifactId>
        </exclusion>
      </exclusions>
    </dependency>
    <dependency>
      <groupId>org.springframework.boot</groupId>
      <artifactId>spring-boot-starter-jetty</artifactId>
    </dependency>
중요한 것은, jersey를 사용하는 경우 pom.xml의 jersey 종속성에서도 tomcat 관련 모듈을 제외해야 한다.
Undertow로 내장 웹서버를 변경하기 위해서는 다음과 pom.xml을 수정하면 된다.
    <dependency>
      <groupId>org.springframework.boot</groupId>
      <artifactId>spring-boot-starter-jersey</artifactId>
      <exclusions>
        <exclusion>
          <groupId>org.springframework.boot</groupId>
          <artifactId>spring-boot-starter-tomcat</artifactId>
        </exclusion>
      </exclusions>
    </dependency>
    <dependency>
      <groupId>org.springframework.boot</groupId>
      <artifactId>spring-boot-starter-web</artifactId>
      <exclusions>
        <exclusion>
          <groupId>org.springframework.boot</groupId>
          <artifactId>spring-boot-starter-tomcat</artifactId>
        </exclusion>
      </exclusions>
    </dependency>
    <dependency>
      <groupId>org.springframework.boot</groupId>
      <artifactId>spring-boot-starter-undertow</artifactId>
</dependency>'Backend' 카테고리의 다른 글
| Spring Boot 어플리케이션 Java 6 호환 수정 (1) | 2020.06.16 |
|---|

댓글